Snake Animation Tool - Quick Start Guide
1. Position the snake mesh
Position the snake mesh along the workspace x-axis, so that the snake is facing towards the positive X direction, and the base of the snake's head is positioned at the origin of the grid. As shown in the image below:

2. Name the snake

3. Select the snake mesh
Select the snake mesh, then click the "Select Mesh" button.

4. Click on the "Create Rig' button
This creates a joint chain and IK Spline Rig used to animate the
snake mesh.
(The selected mesh will automatically be renamed to match
the snake name).
By default, the skeleton is set to match the length of the mesh.
If you
would like to change default settings you can look in the Rig Settings
options which gives you the option to change the number of joints and also
the length of each joint. If you only change the number of joints, the skeleton
will still be created to match the length of the mesh. If you click on Joint
Length and type in your own value, then the overall length of the skeleton
will be equal to the number of Joints multiplied by the joint length.
If at any point you would like to change these options, you will need to make the changes before clicking on the Create Rig button.

5. Click on the "Attach Rig" button
This automatically binds the joints to the snake mesh, creates animation controls to animate the IK Spline Rig, and automatically adjusts the skin weights.
If you would like to change the default settings, you can go in to the Rig Settings and adjust the Number of Controls and the Number of Handles. The number of Controls sets how many controls are used to animate the snake. The number of Handles sets how many control handles are created which can be used to manually adjust the controls. A handle for the head control is always created so a default setting of 2 creates an extra 2 control handles along with the head control handle.

6. Select the snake path
Create a path for the snake to follow using Maya’s CV Curve Tool or EP Curve Tool.
Select the path and then click on the “Select Path” button.
(The selected path will automatically be renamed to match
the snake name).

7. Click on the "Attach Snake To Path" button
Click on the Attach Snake To Path button.

This attaches the snakes IK Spline Rig to the selected path (using Maya’s Attach To Motion Path constraint function).
The snake mesh will now move along the path but without any side to side movement.
Note:
if you would like to detach the snake from the path, click on the 'D' button next to the 'Attach Snake To Path' button.8. Click on the "Create Animation" button
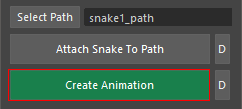
This automatically creates keyframes for the snake’s side to side movement using default settings. These settings can be modified and keyframed in the “Animation Settings” which is outlined later in this manual.
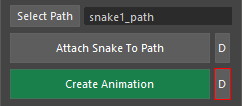
If you would like to delete the side to side movement keyframes, you can click on the 'D' button next to the Create Animation button.
Animation Settings

For more control over the snake animation, the following attributes can be adjusted:
Animation Start Frame
This sets the start frame for the snake's movement along the selected path. Changes to this value automatically alter the 'Average Speed' value.
End Frame
This sets the end frame for the snakes movement along the selected path.
Changes to this value automatically alter the 'Average Speed' value.
Average Speed (cm/s)
This sets the speed of the snakes movement along the path.
Changes to this value automatically alter the 'End Frame' value.
Wave Length
This sets the number of waves in the snakes body as it moves along the path.
(This value is keyable).
Wave Amplitude
This sets the size of the wave movements in the snake's body as it moves along the path.
(This value is keyable)
Wave Rate
This value sets how fast the snake's wave like movement occurs relative to it's movement along the path.
- A value of 1.0 sets the wave movement to be stationary relative to the ground.
- < 1.0 sets the wave movement to be slower then the snake's movement
- 1.0 sets the wave movement to be faster then the snake's movement
Path U Value
This attribute can be used to keyframe the snake's position along the path.
A value of 0.0 sets the snakes position to the start of the path.
A value of 1.0 sets the snakes position to the end of the path.
A value of 0.5 sets the snakes position to half way along the
path.
Precision Settings

When you run through the script using default settings a limited number of keyframes are created for the snake’s side to side movement. For some animations you will need to add extra keyframes to maintain a realistic snake movement.
Add Keyframes (button)
Click on this button to create additional keyframes in the selected time rage.
Precision
This setting controls how many extra keyframes will be created. A lower precision value will create more keyframes then a higher precision value.
Apply From Frame
This is the first frame in the time range where extra keyframes will be added
To Frame
This is the last frame in the time range where extra keyframes will be added
Always Active (check box)
If selected, when you click on the “Create Animation” button, the
mzSnakeTool automatically creates keyframes as before, but also adds
additional keyframes to the snake animation (based on the precision
setting).
The script takes longer to run when this is selected as it creates
additional keyframes.
If not selected, then the script will create a limited number of keyframes. Additional keyframes can then be added using the “Add Keyframes” button (to the time range as set in the Precision Settings).
Rig Settings

For more control over the snake rig set up, the following attributes can be adjusted:
Number of Joints
Sets the number of joints used along the length of the snake.
(More joints means smoother animation)
Number of Controls
Sets the number of controls used to animate the snake’s joints.
These controls affect the snakes IK Spline curve.
Number of Handles
This sets the number of control handles created.
These handles can be used by the animator to make manual
adjustments to the snake animation. A handle for the head
control is always created. Extra handles are created along the
spine according to the value set here.
Joint Length
This attribute can be enabled or disabled by clicking on the
“Joint Length” button.
- if disabled, the length of each joint is automatically
calculated so the given number of joints extends along the
entire length of the snake mesh.
- If enabled, a custom value can be entered which will
affect the overall length of the joint chain.
Progress Bar

The progress bar at the bottom of the UI window notifies you on progress through each part of the rigging and animating process.